So my little K turned three! When asked what kind of party he wanted he replied Star wars. I couldn't have been happier!!! We love Star Wars! So he and I looked at a few cakes and such floating around blog land. I have to admit my heart may have skipped a beat when he picked this one from the Baked by Jen blog. She did an amazing job that totally trumps my cake! My first thought was...Oh No ...how will I ever pull this off. I have never made a cake like this but I guess there is no time like the present. I put on my big girl panties and did what any Mom would ....Asked for a million opinions from the Moms on my crafting board! LOL I finally decided on a plan and found an awesome recipe from Bakerella and started my cake. By the way that recipe is to DIE for!!! We just used the cake and filling recipe....the cake was super moist and the filling was Delish!
Below you will see the base of R2D2. I just baked 4 eight inch rounds, stacked, and iced them. I made sure all my layers were even and uniform...there is nothing like a lopsided cake. Then I added my filling, and did a rough coating with the butter cream. I also added 5 small dowels so my cake wouldn't droop or fall in any places. I put it in the freezer briefly to firm up while I made another batch of butter cream. The outside layer just got a good coat of basic butter cream. I have the recipe Here at the bottom of my Monster Birthday bash cake. My guys aren't too fond of fondant so I only used it for the detailing and to cover my rice cereal treats for the head.
OK I have to apologize here....at this point my hands were covered in coloring, rice cereal treats, and butter cream so the photos are few and far between. For the head I made a batch of your regular rice crispy treats. The only thing I did differently was used a little less butter so the treats would be a little stiffer. To get the shape of the head you simply fill your cake pan with the treats and shape into a dome. If you had a bowl the same diameter of your cake you could use that too. Just make sure to spray a little cooking spray on your bowl or pan so they won't stick. Once it was shaped and had stiffened up a bit I covered it with a nice layer of butter cream and put it in the freezer to chill.
Now since I have just told you about the head I should also tell you about the legs since they are also made of the rice cereal treats. For the legs I just measured the height of my cake and shaped the treats into 2 T shapes just a couple inches shorter than my cake. After all your treat pieces have been covered in butter cream, and set, cover them with fondant. The head is covered with black and then painted with luster dust. Did you know if you don't have Vodka on hand to paint the luster dust on you can use the same clear vanilla extract you used in your butter cream? Oh how I love google! As you can tell from my paint job this is my first time using luster dust. A little good to know.....it takes it a little while to dry. LOL My other fondant pieces kept sliding down.
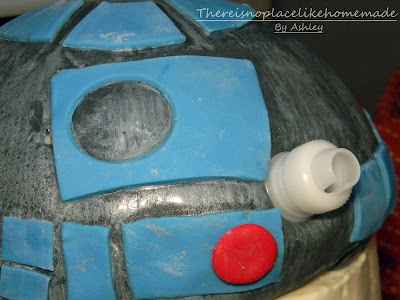
I googled the heck out of R2D2 images and drew out my detail pieces on paper. Then I simply traced it out in my fondant. Now he is not perfect and by no means an exact replica but I was happy with how he looked so I went with it. For the head a large glass gave me the perfect circle and I just cut it in quarters and cut a smaller circle out of the middle with a small round object I had in the kitchen. I forget now what it was but I also used an empty spice jar to cut out the large lens area on the front of his head. Take a look around your kitchen....I bet you will find a few things you can use.
I
For his little eye thingy I just used a piping coupling. Later I filled the spaces where there were lenses with black piping gel. The head and body seam was a little sloppy so it was doctored up with a little blue fondant stripe right over the seam. For his legs, I just covered them in white fondant and attached them with dowels. I also colored just a small amount of fondant orange and made some little connector wires for his legs...just like the inspiration cake. I did, however, forget the little leg under him. I realized this as I was finishing him up ....Of course! I never see these things until I am almost done. Oh well my R2D2 in in rest mode! LOL
My little R2D2 was a hit!! K was over the moon for him! Nothing could have made me happier than seeing his little face light up at the sight of his cake. For the candles we used the sparkling candles. With R2D2 I always remember him shooting that little spark so what better than sparking candles. it was so much fun making him and to be honest no where near as scary as I thought it would be. I couldn't be happier with the outcome!!! So, what do you think? Would George Lucas be stoked or probably scoff at my attempts of his masterpiece? I would hope he would be stoked.;)
The next time you are faced with a crazy, scary task remember just have fun with it. If it is coming from love that is all that matters! The first step is to just start. Feel free to ask any questions in the comments or my email address.
Linking Up!!
 |
| http://www.shineyourlightblog.com/2012/04/mangia-mondays-white-sangria.html |


Wow! It looks fantastic! I think my kids would die of shock if I ever busted out a cake like that. Great job! :)
ReplyDeleteSarah...ThankYou!! You should make this for the kids. With your sculpting and overall creativesness I am sure it would be awesome! Glad you liked it!
DeleteAwesome! I will have to try this for Zeke this summer! :)
ReplyDeleteThank YOu Dawn! Make sure to share some pics!
DeleteStar Wars..Buttercream.....it doesn't get any better!!! I love your cake!
ReplyDeleteSo cute!
ReplyDeleteThank you so very much Hollie! Also thank you for stopping by for a visit and I hope you will visit again soon!
DeleteYou did a really nice job on your cake. My son's birthday is this week, but he thinks he is too old for themed cakes. :( I would love i if you would stop by and post in on my linky party Dare to Share.
ReplyDeletePam
http://pamspartyplanning.blogspot.com/2012/04/dare-to-share-4.html
Thank you! I would be delighted to link up! Tahnk you for the invite!
DeleteAshley, you did a great job on the cake!
ReplyDeleteThank you so very much Jen!!!!
DeleteThank you so much for share your wonderful cake on Dare to Share. You have been chosen as one of this weeks features. The feature post will be posted shortly. Please come back and share more ideas on this weeks Dare to Share.
ReplyDelete