Monday, October 8, 2012

Quick, Easy, Cute Halloween Wreath!

 
Happy fall everyone!! It is that time of year again! My favorite. I love the fall. Halloween, Thanksgiving, Christmas, cool weather, warm coco, and fuzzy socks. Mr. Wonderful and the boys picked up some pretty, glitter covered pumpkins for the font door. We put out all our other spooky decor out but still felt something was missing. A wreath of course! Our door looked so lonely and empty. I remembered seeing some pretty, colorful garland at Publix and had an idea.

 
This is what you will need.^^ A wreath. Any kind will do. I used an old yarn covered wreath. Two different colored strands of Halloween garland. Also for fun factor a bright colored length or ribbon for a pop.
 
List:
Wreath
Halloween garland (2)
Ribbon
(long enough to hang from you your door and wrap around the wreath)
 
 
This garland was so cute. Black and white skulls, and purple and black witches.


So start by wrapping your garland around your wreath leaving only about an inch between each strand. You want it nice and full. When you get to the end of your garland just tuck and wrap the end. My garland was a bendable wire garland. Don't worry if yours isn't simply tie a good knot to secure the end. Then you take your second garland and wrap it in between the spaces of the first strand. finish the ends just the same.
 
 
When you are finished wrapping you should have something like this picture below. Almost done! See I told you quick and easy.:)

 
Lastly you slip knot your ribbon around your wreath and hang.
You can have any type of hanger on either side of your door. I personally have an upside down command hook on the inside of my door. I just bring my ribbon up and over the top of the door and tie it around the hook on the other side. I have a picture of this from my Christmas wreath tutorial just scroll down the page Here.


Viola! Quick, Easy, and if I do say so myself, cute Halloween wreath. I hope you all have a spooky Halloween!! Happy Fall everyone!


Linking up!!
Skip To My Lou
 
Grab a button!
Spotlight Saturday
I Heart Nap Time

Sunday, September 23, 2012

Remember me.....an update and some herb drying tips.:)

Greek Basil
 
So I guess I took a little break. Summer brought many fun new adventures for us. We started some new fun activities, made new friends, and attempted to grow some vegetables. ;) We fill our days with play dates, story time, and family nights. Not that I don't like blogging but I think it was a nice change. You know how sometimes you get so involved in something you forget to look around. Well I have been looking around. These moments are precious. My boys are 2 and 3 and I don't want to miss this. :) So my post will be here just in between the all the little moments. I wanted to share a few picks with you guys.


Dill


While our vegetables weren't very bountiful (we are working on that) our herbs were. Our little herb table was full of dill, basil, parsley, chives, mint, and onions. We also have a big rosemary bush planted in the yard. When the herbs are ready for harvest I just wash them really well and hang them to dry in a dark, dry corner in my kitchen. Once they are dry I store them in a zip loc baggie until they are ready to be used. You get the best flavor if you wait to crush them right before using them. Hopefully next year we will have a better vegetable turn out.


Basil Harvest
 
Hoping you all had a wonderful summer!

Thursday, July 26, 2012

Crochet Therapy


So with the crazy summer we have had so far there hasn't been much time for anything crafty. I have been able to squeeze in some crochet here and there. Just wanted to share some pics and sites. My friend Sarah at The Spicy Pinecone reminded me of the Lion Brand Site . FYI: You have to sign up for their newsletter to see their patterns. I had forgotten all about it until Sarah said something about it. And i am so glad she did....I found a ton of cute projects. My first was a market/beach tote. I will be using it as a beach tote. I wanted something that wouldn't hold all the sand but would stretch well with all of our goodies. Here is the link, just remember you will have to sign up to view the patterns, so keep that in mind.. pattern link


This bag is SO roomy! I was able to get 16 of K & E's books in there with plenty of room left. The bag snapped right back to it's shape after I took the bags out.


 I wanted to see what amount of clothing I could get into it.  Eight! Six pair of jeans, one pair of sweat pants, and one pair of dress pants. Can you believe I still had room left. I am so happy with this bag. I was very easy and quick. It took me about three days and I was only working on it here and there.


So do you know how to Crochet? Or any other craft that is very easy and relaxing? Oh and anyone who doesn't know how to crochet...it is very easy to learn. Youtube has dozens of tutorials and there are some great teaching books out there. I have this one...Stitch Bitch Crochet Happy Hooker by Debbie Stoller. Awesome book with great photos. I am a visual learner so this really helped. Plus the book is full of cute patters. So if you were thinking of trying crochet....Do It! It is very easy to learn and once you start you will not want to stop.:)
 .

** I in no way represent Lion Brand nor Debbie Stoller. I do not work for either of them and I am not paid by either of them. They are simply a book and site that I like.**

Saturday, July 7, 2012

Sometimes Quiet is a good thing.:)


I made this in PicMonkey. If you haven't seen the site you should check it out. Oh and this is my first subway style art so take it easy on me.

There is a photo quote that hangs in my dining room and it says, "Make time for the quiet moments as God whispers and world is loud." I am not sure what wise person said this but that is just what we have been doing this past month. I haven't had much time or energy to post or do anything to post about. Our household has had it's share of down time this month due to a month long bout of bronchitis and the loss of a beloved pet. It has been a slow, quiet, family summer. There have been no play dates or late night sewing ventures. Only movies nights  with dinner on the rug in the living room, lots of playtime with the kiddos, and naps for everyone. It is nice to slow down and press pause every once and a while. Some times we just need to unplug. Hopefully this will be the end of cold and I will be feeling a bit more creative. I have been working on some crochet here and there and will probably post about them soon. Until then, I am still here....just taking time to enjoy the quiet moments. You should try it sometimes. It feels good.:) More post to come.:)

Friday, May 18, 2012

Giveaway Event at Welcome to the Mouse House!!!

Who doesn't love a great giveaway!! Well my sweet friend Hayley over at the Welcome to the Mouse House Blog is holding an amazing giveaway event. It is filled with wonderful items from some pretty wonderful vendors. My  friends Sarah from the  Spicy Pinecone and Rebecca from Searching Out Simple   are among the wonderful vendors contributing to all the goodies. I have yet to contribute to any giveaways so what better for my first contribution. I am pretty darn excited! For Hayley's giveaway I am offering one of Peonies Hair Clips. This is my favorite flower clip.


I believe in all she has 20 vendors participating!! The prizes are awesome. Go check them out! Here is the Link . Make sure to read the rules and good luck to everyone. :)

Wednesday, April 25, 2012

Spreading the word....Please keep it moving.

While checking my face book page today I saw a post from Hayley over at the The Mouse House Blog. It is a heart breaking video from a father standing up for his son. This video is very eye opening and sad. The things that were said and done by the people in this classroom audio is so very upsetting and completely unacceptable! The fact that the school and officials allow them to still teach is horrifying! I really hope these words spread and there is action taken on behalf of these beautiful children whom have been subjected to this unbelievable classroom. So please pass this along....speak for the children.


Edited to add a link for his petition..... Here

Thursday, April 19, 2012

Ultimate Blog Party by 5 Minutes for Mom.com

Ultimate Blog Party 2012

 I have been super consumed with home improvements and almost missed this amazing opportunity to join the 2012 Ultimate Blog Party. I was catching up on my blog reading when I came to Fantastical Sharing of Recipes blog post from Sarah about an Ultimate blog party. This my first time hearing of it and of the Amazing site 5 Minutes for Mom . I will definitely be signing up as a reader.

So to reintroduce myself.....hmm lets see. Hi my name is Ashley! I am a 29 year old stay at home mom. I have two wonderful boys, K who is 3 and E who is 18 months old. I am married to Mr. Wonderful whom I met almost 10 years ago and later claimed 4 years ago. LOL My blog is a place for me to escape to every now and then....  Here is a little  Post  a behind the blogger so to speak about why and how I came about blogging. I happened upon blogging with a nice forceful push from my little sister who was exploring her computer class in high school. She had just learned a little about wed design and I was her guinea pig. LOL I am so happy she did!!!

When Mr. wonderful and I decided to have children we both knew that we would want them here at home so I quit my job and very quickly became bored. While wondering around walmart one night Mr. Wonderful pointed out a sewing machine to me and it was love at first sight. So I would sit in my living room at night with my tiny table and 8 stitch singer and make little odds and ends for the babies. Since then I have graduated to a sewing room, a much better sewing machine, and an arsenal of different crafting know-how. I love to sew, bake, crochet, sculpt, photograph, and just be crafty in general.

Other random facts about me....
 I love reading! There is something magical about leaping into the pages of a good book. English and Literature where my favorite subjects in high school...though i am sure you can't tell in my writing. My English teacher would be very ashamed. LOL So if you are looking for proper punctuation and grammar...I can't make any guarantees. I love sharing craft ideas and making new friends.  

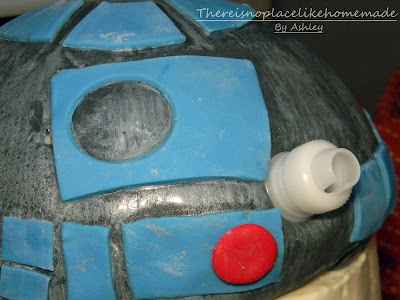
R2D2 Cake!!!!


So my little K turned three! When asked what kind of party he wanted he replied Star wars. I couldn't have been happier!!! We love Star Wars! So he and I looked at a few cakes and such floating around blog land. I have to admit my heart may have skipped a beat when he picked this one from the Baked by Jen blog. She did an amazing job that totally trumps my cake! My first thought was...Oh No ...how will I ever pull this off. I have never made a cake like this but I guess there is no time like the present. I put on my big girl panties and did what any Mom would ....Asked for a million opinions from the Moms on my crafting board! LOL I finally decided on a plan and found an awesome recipe from Bakerella  and started my cake. By the way that recipe is to DIE for!!! We just used the cake and filling recipe....the cake was super moist and the filling was Delish!

Below you will see the base of R2D2. I just baked 4 eight inch rounds, stacked, and iced them. I made sure all my layers were even and uniform...there is nothing like a lopsided cake. Then I added my filling, and did a rough coating with the butter cream. I also added 5 small dowels so my cake wouldn't droop or fall in any places. I put it in the freezer briefly to firm up while I made another batch of butter cream. The outside layer  just got a good coat of basic butter cream. I have the recipe Here at the bottom of my Monster Birthday bash cake. My guys aren't too fond of fondant so I only used it for the detailing and to cover my rice cereal treats for the head.


OK I have to apologize here....at this point my hands were covered in coloring, rice cereal treats, and butter cream so the photos are few and far between. For the head I made a batch of your regular rice crispy treats. The only thing I did differently was used a little less butter so the treats would be a little stiffer. To get the shape of the head you simply fill your cake pan with the treats and shape into a dome. If you had a bowl the same diameter of your cake you could use that too. Just make sure to spray a little cooking spray on your bowl or pan so they won't stick. Once it was shaped and had stiffened up a bit I covered it with a nice layer of butter cream and put it in the freezer to chill.

Now since I have just told you about the head I should also tell you about the legs since they are also made of the rice cereal treats. For the legs I just measured the height of my cake and shaped the treats into 2 T shapes just a couple inches shorter than my cake. After all your treat pieces have been covered in butter cream, and set, cover them with fondant. The head is covered with black and then painted with luster dust. Did you know if you don't have Vodka on hand to paint the luster dust on you can use the same clear vanilla extract you used in your butter cream? Oh how I love google! As you can tell from my paint job this is my first time using luster dust. A little good to know.....it takes it a little while to dry. LOL My other fondant pieces kept sliding down.


I googled the heck out of R2D2 images and  drew out my detail pieces on paper. Then I simply traced it out in my fondant. Now he is not perfect and by no means an exact replica but I was happy with how he looked so I went with it. For the head a large glass gave me the perfect circle and I just cut it in quarters and cut a smaller circle out of the middle with a small round object I had in the kitchen. I forget now what it was but I also used an empty spice jar to cut out the large lens area on the front of his head. Take a look around your kitchen....I bet you will find a few things you can use.
I


For his little eye thingy I just used a piping coupling. Later I filled the spaces where there were lenses with black piping gel.  The head and body seam was a little sloppy so it was doctored up with a little blue fondant stripe right over the seam. For his legs, I just covered them in white fondant and attached them with dowels. I also colored just a small amount of fondant orange and made some little connector wires for his legs...just like the inspiration cake. I did, however, forget the little leg under him. I realized this as I was finishing him up ....Of course! I never see these things until I am almost done. Oh well my R2D2 in in rest mode! LOL


My little R2D2 was a hit!! K was over the moon for him! Nothing could have made me happier than seeing his little face light up at the sight of his cake. For the candles we used the sparkling candles. With R2D2 I always remember him shooting that little spark so what better than sparking candles. it was so much fun making him and to be honest no where near as scary as I thought it would be. I couldn't be happier with the outcome!!! So, what do you think? Would George Lucas be stoked or probably scoff at my attempts of his masterpiece? I would hope he would be stoked.;)


The next time you are faced with a crazy, scary task remember just have fun with it. If it is coming from love that is all that matters! The first step is to just start. Feel free to ask any questions in the comments or my email address.


Linking Up!!

http://www.shineyourlightblog.com/2012/04/mangia-mondays-white-sangria.html


Laugh, Love, & Craft

Skip To My Lou


I Heart Nap Time


Funky Junk's Sat Nite Special


Friday, April 13, 2012

Cute Giveaway Alert!!

 Who loves an awesome giveaway? Everyone , of course.  Sarah, the wonderfully crafty mom behind the Spicy Pinecone blog, just posted an Eric Carle Cloth giveaway set.

Add caption
Link for giveaway HERE .
This adorable set includes three cute burp cloths and a "Brown Bear, Brown Bear" board book.
I  love the look of the little burp cloths with the Eric Carle fabric! They are handmade by Sarah. Each cloth is 100% cotton and the cute fabric is attached to a Gerber pre-folded 3-ply Birdseye cloth diaper. Giving you great coverage for spit ups or spills.  So go over, check out her blog, and how to enter for a chance to win the beautiful goodies Sarah has up for grabs! Good luck!!


P.S. Soon I hope to get up more on the Star Wars Party including how I brought my R2D2 cake to life. The past 2 weeks we have all had a horrible cold, resurfaced our pool and replaced a window...needless to say there hasn't been much time for anything else. Oh and I made my first sale!!! Yay! Thank you dear customer...you know who you are!

Friday, March 23, 2012

Star Wars Freezer Paper T-Shirt Favors!!!


So my first born K just turned 3. He requested a Star Wars party. With parties I like to give out favors that are useful So this year I decided to do freezer paper t-shirts.
Let me start by saying it was almost impossible to find plain t-shirts in assorted sizes that weren't too cheaply made. Can't believe it was so difficult. I finally found some at the Dollar store and still had to buy a couple packs of the plain white undershirts and cami's.

What you will need:
T-shirts
Freezer Paper(this can usually be found in your local grocer in the Reynolds wrap section)
Iron
Self Healing Mat(this is helpful but can be done w/o just ues really thick cardboard)
Fabric Paint or Acrylic paint mixed with a Textile Medium
Foam Brush
Stencils
Craft knife or or some sort of exacto knife

You will first need to decide on what images you will be putting on your shirts. You can usually find a ton of free clip art or free stencils. You can also use coloring book pages. Just remember when choosing an image you will be cutting out all the detail....a lot of detail equals a lot of cutting.
Oh and prewash your shirts first if they are new.


Trace you image onto your freezer paper or if you are brave cut your freezer paper to the size of copy paper and send it through your printer. Just make sure to print it on the smooth side and not the waxed side. Cut out your images out with your exacto knife. Now here I also like to cut an extra solid piece of freezer paper to iron to the inside of your shirt. This will keep the paint from bleeding and it will stay put. Line you image up with you t-shirt wax side down and iron it to your shirt. be gentle here so you don't catch the edge of your iron and rip it. Let's just say that tidbit came from a lesson learned. ;) Now I forgot a pic but I am sure you get the idea.

Once ironed get out your paint supplies and get to painting. now if you don't have fabric paint or want to use acrylic paint remember to add your medium first. The directions are on the bottle.


Sponge it on very well....you don't want any missed spots. allow to dry completely and check for any missed areas.


Once it is completely dry and you are satisfied with your paint job peel off your freezer paper.


  You aren't done quite yet. You still need to heat set your paint job. This will help to set your color for washing. Place a thin piece of fabric over your painted area and iron for a few minutes. Don't burn your fabric...make sure it is on the correct setting. And DO NOT steam it.


The TA-DA!!!!! Adorable t-shirts!!! Now you can do this to any shirt or fabric for that matter. You can use this in everyday life just to dress up your child's wardrobe or even your own. Have fun with it! I loved these and made a few extra for my boys! What do you think? Would you be happy to receive something like this as a party favor for your child?


If you decide to try this let me know and share a pic. I would love to see!Oh and I need to send out a big THANK YOU to my friend Megan for helping me get these started. Thank you to my mom and sister for helping me finish them! Thank you!

Linking up....

UndertheTableandDreaming
I Heart Nap Time

Skip To My Lou
Related Posts Plugin for WordPress, Blogger...