Showing posts with label sewing. Show all posts

Thursday, May 23, 2013

Bookbinding Away!

I am still here!!! Just busy, busy.:) Books are all coming together and will be ready for the shop really soon. Here is a sneak peek of what I have been up to.

This first picture is an something new I am trying. I will post about it if it turns out how I want it to. Heck, I will post about it if it flops too. Maybe someone else might find my mistakes helpful or just want a laugh. Haha!
 
 
Mini jotters! I love these. They are perfect to stick in a purse or diaper bag. They would probably even fit in your pocket. Perfect for on the go.

 
I have been busy with book cloth! I only have a shot of one of the book cloths but have four others in the works. This one is a super soft wool linen blend that I absolutely adore!


The newest binding technique which is also my favorite now. :D  A hardback pamphlet bind. I am over the moon for the look and how nice these work up. I need to get proper pictures but it was too pretty not to share. I hadn't seen this technique before I stumbled across a wonderful blogger and youtuber while doing some binding research. Lee from Crafty Loops has some AH-MAZING tutorials on book binding and all sorts of fun crafts. Crafty Loops You Tube Channel She is so very sweet and helpful. Thank you Lee for your kind words and awesome tutorials! I swear she is as sweet as her Irish accent. :)
 
 
Alas, I have also been doing some sewing!! I have a few more sewing projects but I need to get photos. I swear not enough time in the day. Between two boys, starting preschool homeschooling, preparing for the shop, everyday life, most days I am not sure if I am coming or going.


Hoping all this work pays off when the shop opens!
 
Linking up!
 
 
By Stephanie Lynn


Inspire Us Thursday at Organized 31

Friday, April 13, 2012

Cute Giveaway Alert!!

 Who loves an awesome giveaway? Everyone , of course.  Sarah, the wonderfully crafty mom behind the Spicy Pinecone blog, just posted an Eric Carle Cloth giveaway set.

Add caption
Link for giveaway HERE .
This adorable set includes three cute burp cloths and a "Brown Bear, Brown Bear" board book.
I  love the look of the little burp cloths with the Eric Carle fabric! They are handmade by Sarah. Each cloth is 100% cotton and the cute fabric is attached to a Gerber pre-folded 3-ply Birdseye cloth diaper. Giving you great coverage for spit ups or spills.  So go over, check out her blog, and how to enter for a chance to win the beautiful goodies Sarah has up for grabs! Good luck!!


P.S. Soon I hope to get up more on the Star Wars Party including how I brought my R2D2 cake to life. The past 2 weeks we have all had a horrible cold, resurfaced our pool and replaced a window...needless to say there hasn't been much time for anything else. Oh and I made my first sale!!! Yay! Thank you dear customer...you know who you are!

Monday, January 9, 2012

Blogger's Choice Fat Quarter Bundle!!!!

Did you know about the Blogger's Choice Bundle from the Fat Quarter shop? I didn't until a few days ago. I saw this post  Blogger's Choice Fat Quarter Bundle @ Quokka Quilts Blog . It seems The Fat Quarter Shop will be giving away one lucky person's personal picks!!!!


So I went to the fat quarter shop and became instantly overwhelmed by all the fabric choices. I found Great tips for choosing my fabrics from Heidi at Boys, Buttons, and Butterflies. Oh and she also gives some great tips in making a mosaic in adobe HERE.

I found one great print(the second one on the first row) and drew inspiration and color from that print. I also set out with a purpose in mind for this fabric. If I were to have all this fabric I would make a quilt for my bed. My room is a very soft grey and I thought these would really bring my room to life. I am in love with all these fabrics!


Rows from left to right:

Row 1:
 Modernology Deep Sea Floralism
   Modernology Azure Fashionable
Heirloom Indigo Fez
Paradise Evening Showers

Row 2:
Lanikai Blue Peacock
Bespoken Bright Fashion Mood
Lark Lemon Souvenir
Oval Elements Golden

Row 3:
Modernology Blanc Avant Garde
  Promenade Blue Damask Mosaic
Palladium Gray Tear Drop
Palladium Gray Peacock

Row 4:
Bella Solids Marine
Michael Miller Jewel Cotton Couture
Bella Solids Fig Tree Olive

I was really drawn to all these beautiful colors and the large prints. What do you think of my collection?

OK so head on over to Quokka Quilts and check out all the details so you can have fun picking out all the deepest fabric desires of your heart. Oh and here is a link to The Fat Quarter Shop 

Fun little tidbit.... do you know what a Quokka is? Click here to find out!
I had no idea a Quokka was so adorable. Check out Laura's blog. It is full of craft goodness and her story in the link about how her name became Quokka is very sweet. Good Luck Everyone!!!!

Sunday, November 6, 2011

Sumo Baby Halloween Costume!


So this year K insisted on being Iron man. I did not feel up to the challenge of making an Iron man outfit so we bought one. E  is too young to choose so Dad had a brilliant idea. Sumo Baby! He is around 23 pounds and quite the chunky little monkey. So it was a go. I did a lot of research on the actual Sumo gear and took notes. It was surprisingly simple to sew and I personally loved it....I will let you be the judge...


I couldn't find a wig in his size so I made a crochet beanie with a folded ponytail in back.


Here is a view of the back. I think it is such a funny costume. All the people handing out candy really got a kick out of the suit.


I am going to try to break down the construction in words. I did this the day before Halloween so no process pics. Sorry...i am a slacker. :) It is a basic T shape. I measured my son's waist and divided by two. With that number I cut a small piece of foam. Then I took the waist measurements and added a little length so I would have enough tail to tie it twice. I decided how wide I wanted it and then doubled the number. So I cut my waist band and folded in half. I sewed the length of the waist band and left the ends open. I slid my foam in, centered it, and then sewed the fabric closed on each end of the fabric to hold my foam in place. I turned and pressed the ends of the waist band and top stitched closed.


For the flap I just eyeballed the length. You want it long enough to come over the waist band and then a few extra inches. I simply cut a rectangle as wide as the front of my sons diaper and hemmed the edges. Turn your waist band right side facing down and attach the flap to the bottom inside of the waist band under the foam. I did gather mine just a tad. You are done. It is that simple. I put it around his waist and made 1 simple knot in the back. Take your flap and come down over the front of the diaper, when you are half way down start twisting the fabric to get the look in the back. Bring your twist up over your knot and use those extra inches of the waist tail to make another knot over the flap.  Tuck the remaining flap around the waist band  and you should be left with two small tail pieces sticking out. That is the look you want. I believe I have it in a pic above. If I have done a horrible job explaining this please email me and I will try to explain better.


For the hat I did a simple beanie and added the flaps in like you would ear flaps just on the crown of the head. I started large and decreased down to the base on the top flap. the bottom flap I left the same size from beginning to end so it would resemble the thickest part of the pony tail.


I also threw together a quick diaper coverTutorial Here @ Danamadeit and  robe. It isn't very cold yet but can get slightly cool at night so I thought the robe was a nice little wind blocker. Although he really didn't need it.


I hope I explained everything ok. Again if I didn't feel free to comment or email me and I will try to give you a better description.
~I hope you all had a Happy Halloween!~


Tuesday, November 1, 2011

Baby Shower Goodies!


Don't you just love looking at little bitty baby stuff? I do. I also enjoy making it. This little loot of goodies is for a friend expecting a little boy at the end of the year. I hope she likes them. These are all pretty simple items to make but if anyone is interested I can do a tutorial on them or shoot them an email with the instructions. It was late and I had no time to take pictures of the process. ;(

The first item was a car seat canopy. I simple rectangle with cotton on one side and flannel on the other. I used wide, satin ribbon for the ties.


For the next item. I have been brushing up on my crochet skills. When I was little my grandmother taught me the basics. More recently I purchased the book the Happy Hooker and watched tons of tutorials. By the way youtube is awesome!  This is just a simple ear flap hat with braids. I think it took about an hour from start to finish. I love how quickly these work up.

Here is my trusty childhood Ewok modeling for me. It was late and he was the only willing model. LOL! Sorry for the not so great photos....like I said it was late so flash lighting.


Gotta love variegated yarn.


And lastly, burp cloths. These are simply rectangles with a mid line sewn for easy folding and decorative top stitching on the edges. I used a microfiber cloth on one side and flannel on the other. I used the shape and size of the microfiber cloth and just cut my flannel to size.


I hope this gives you some ideas next time you have a shower to attend. Your options are endless. I don't know about you guys but I absolutely love it when someone takes time to make myself or my children something.


P.S. Coming soon Halloween post...with a baby Sumo costume and post about some Mommy goodies I had ordered, received , and tested.

Sunday, October 30, 2011

Handmade Holidays @ Sew, Mama, Sew!!!


Guess what is coming!?!
I am sew excited!


I can't wait to see all the awesome tutorials and holiday inspirations.
Make sure to check it out, you don't want to miss this!
Added bonus....they have some great prizes to giveaway!

Monday, October 10, 2011

Project Spools


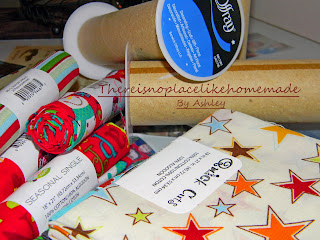
In the fabric store certain fabrics grab my attention for certain projects. While my intentions are great at the time I don't always follow through with a project. I have been known in the past to stash and dash certain fabrics. Usually I  forget I have them. Horrible right....well I think I have found a solution. Project spools. This is great for projects with smaller cuts.

Currently I have some fat quarters for a fall/winter table runner. While redoing my craft room I found them stuffed away, still in the bag :-o This is what prompted this idea.

Supplies:
Empty Tulle spools or any larger type spool
(you could probably cut a paper towel spool in half)
Small rubber bands
post its or small scrap of paper
fabric 


Start by pulling the label and stickers off your fabric. Unfold then length ways but don't unfold them the rest of the way. If your fabric is from the bolt just fold it so it is long enough to wrap around your spool and narrow enough to fit on your spool. Line them all up one on top of another.


Take your empty spool and start wrapping your fabric sandwich around your spool.


After it is all wrapped slip a small rubber band over the spool and fabric. I used the little elastic for hair. There are like 50 in a package.


 Write your project info on the post it and slip it under the band. This is also a good place to write little notes about your project you don't want to forget.

Find a cute little container and store within plain sight. I put mine on a small pedestal so I would see it every time I go into my craft room to remind me to do those projects.
This really helps me stay on top of my projects and keep my stuff a little more organized.


Added tip...I use the giant mailing tubes for wrapping and storing quilt tops that aren't finished. You can purchase these pretty cheap or buy a poster. This is what they usually come in. We purchased a couple posters for K's room and I knew instantly what to do with the tubes.


Erdie Industries Twist-N-Pull Mailing Tube, White Kraft, 12 Pack, 1 1/2" ID, 12" Length
Pic from Amazon.com

Thursday, October 6, 2011

Project Runway-Aholic....


                               Photo from  Lifetime.com Project Runway Blog
                                          

Hi. My name is Ashley and I am a Project Runway-aholic. ;}) I have been watching since day one and I think I have a problem. I even have a hard time turning away from re-runs I have seen a million times. There have been a couple of times when I swore I would never watch again (Mondo and Korto) but I can't help myself. I thought both of those designers deserved the win. Just my opinion. Oh and did I mention I LOVE Tim Gunn! "Make it work" "Where's  Andrae" I think if I ever met him I would pee my pants and he would say something clever advising me to clean myself up. Hehe. I also heart Michael Kors. He is so funny (Reggae Jesus) LMAO. This season I am really liking Viktor. I just finished tonight's episode and Tim made me cry being so sweet to Kimberly. I know I am a dork.

Now onto why I really wrote this. I can't contain myself....MONDO is going to be on the Project Runway All stars!!!!! I can't wait! Come on November! I really loved him (who didn't) and I hope he gets the win this time around.

Anywho, I had to cast my excitement somewhere and what better place than blogland. My guys, unfortunately, do not share my enthusiasm for the show. I usually have to search out the ladies on my sewing group to really gossip about the show. So, anyone else as exited as I am for the All Stars?

Tuesday, September 20, 2011

Faux Chenille is in the air~~~

Faux Chenille is in the air right now. Especially among my favorite sewing mamas (you know who you are). I had long ago decide to jump on the band wagon. I have had all this fabric set aside for about 6 months just waiting to be put together. I actually swore I would never make one again after my wild adventures over a year ago with my first faux blanket. That was on my old machine. My new one handles it perfectly and now I don't mind sewing them.

It all started with this Spaceman flannel that K saw in the fabric store one day.He found it in the remnant bin and would not leave the store without it. So i decided to pick up some other flannels while I was there and make a soft, cuddly faux chenille blanket for him. Now that E is much more independent I was able to get it all put together.

I spray basted all my layers and went to town sewing all my layers. If you aren't familiar with a faux chenille blanket or how to make one I am going to include a few links to help you with creating your own. I would have but seeing as I made mine here and there I didn't take the proper photos for a tutorial. Here where I first learned of the blanket .... Aesthetic Nest and here are a couple others ..  MADE and Mercys Mom. All wonderful tutorials!


Don't you just love the soft glow of a sewing machine light.....ahh, I do. ;)
 Now if you aren't familiar with the faux chenille technique I will try to explain a little. You sandwich 4-5 layers of cotton or flannel fabric (you will need a fabric that will fray). Use a good spray baste to make sure your layers stay together. Mark a center line diagonally across your fabric and begin to sew down that center line. You then go out about 1/2 an inch and continue to sew lines parallel to the center diagonal until you have covered the whole blanket with the lines. After you have finished sewing you cut in between all the lines making sure to only to cut the 3or 4 layers of flannel or backing. You do NOT want to cut the front. Also be careful when cutting in the channels because it is easy to catch the front fabric.  


After you are done with all your cutting, square up your blanket, bind it and throw it in the wash a couple of times. You will come out with one of these little beauties!I love how it turned out. The colors worked perfectly together. Plus my boys both love it and all its cuddly goodness.


Here is a close up of all the frayed goodness on the back. It is oh so soft. It completely warms my heart to see one of my little guys dragging this thing around. I  love it when they like what I have made for them.


Here is the first Faux chenille blanket I made. It was for a friends little girl. I could not find the right combo of flannel at the fabric store for this one.  I purchased a package of coordinating receiving blankets that matched perfectly. 


Now fall weather is creeping up on us and these little cozies are just the ticket. Whip one or two or 10 for the little warm loveys in your life!;) Happy Sewing!

Saturday, August 13, 2011

Cute potholders........9 months in the making :-o

Right before E was born I decided all my old potholders must go. I collected all of them and started tearing them apart to salvage any useable parts. I really had every intention of finishing them before he came. Well a few days later I was in the hospital having an emergency c-section with E. He came a month before his due date.  So the months rolled on and life got in the way. I have been burning my fingers with the dish towel for some time now. Nine months to be exact. So I sat down and picked out some of my favorite fabric. I also had the perfect pattern. When Mr. Wonderful got me my new machine he also included this...


It has some wonderful ideas and patterns in it. It is also so very knowledgeable. I love it. Anywho, this book had the cutest heart shaped potholders in there. The second I saw them I knew I must have them for my kitchen. They were very simple and oh so cute. Ok, so I just looked on her website and guess what....there is a step by step free tutorial!! Yay! So if anyone wants to make them here is the link.... http://www.marthastewart.com/how-to/heart-shaped-pot-holders
I made 4 for myself and had a little extra so I made another for a great friend of mine. Here are my little cuties...hope you like them and make some for yourself. They are so fun...

Now some tips. I didn't want to go to the store have insul-brite so I improvised. I used 2 layers of batting and a layer of canvas. I have used them on everything and not once burned myself. Also, you can kinda see in the pic, I added three lines in the middle and it folds like a dream. One right down the middle and one on each side. Make sure not to catch the pocket though. These have definitely started something. I have the urge to now redecorate my whole house. I hope to make major changes. I guess time will tell. ;)

Friday, July 22, 2011

Dr. Seuss quilt top!!!

So when we became pregnant the first time we decided we would have one nursery for the kids. When our second was born we just moved K to a big boy room instead of a new nursery. I have known since I first thought of having children that the nursery would be a Dr. Seuss nursery. I will share those photos in another post and how to achieve easy, inexpensive wall murals like I did.

Well Now that E is almost 9 months old I started thinking about his room. Soon he will be too big for a nursery and will need a big boy room. *boo hoo* Now E won't be moved into a big boy bed for quite some time but I thought I would get a little ahead. He will stay in the Dr. Seuss room. It will just me big boy modified. Here is the chevron quilt top that will be for his big boy bed. I also have a trick I learned in the  process. Now I am no pro quilter...so if you are and see areas where I am doing something wrong please let me know. I am all for constructive criticism. Just go easy I am learning. ;)

Here you can see where I need to improve on my corner skills. E won't care that it isn't perfect.


For this quilt you place two squares right sides together and sew on either side of the middle diagonal line. Instead of taking each square, measuring, and marking I did this. I folded the square in half from corner to corner.


Then I ironed one of the squares to give me my middle mark. It was so much faster and seemed to work quite well.

So this is what you are left with.One folded square and on flat square. 

 Ok so I forgot to get a pic of this but you unfold the pressed square, line it up right sides facing with the flat square, pin, and sew on either side of your crease.  Like this...


After you are finished sewing all the squares you cut the square right down the middle. You can find an awesome tutorial for this quilt here...
Awesome blog by the way. You should check her out!

Here are my squares mid quilt. It is coming along. Now I bought this fabric before it became popular with the pottery barn collection so it was hard to find. Not to mention super expensive because it was out of print. I worked with what little Seuss fabric I had and just added to it with solids to get the size I needed.


Hope you all like it. Now off to see if I have all the photos for the nursery post. When I finish K's room I will have a post for a big boy dino/paleontologist themed room!
Related Posts Plugin for WordPress, Blogger...