Showing posts with label Furniture redo. Show all posts

Friday, April 5, 2013

Craft Table and Mini Craft Room Reveal !!!


Hi all! I know i have been promising a craft room reveal for a long while now. I think over a year to be exact. Honestly it still isn't finished and I am not sure that it ever will be. It is ever changing with my ever changing adventures. Haha! I did take some pictures so I decided to share a peak. These room pictures weren't intended for a room reveal so please forgive the fact that everything still isn't perfect.
 
I was in need of some major storage so Mr. Wonderful decided to give me a crash course with some power tools. Now I know how to use most of the but to completely honest the ones with blades scare the bejesus out of me. :D He helped with the top and the rest was done by yours truly. I was so proud of myself when it was finished. Of course I still asked him a bazillion questions but I did all the physical work. It is no where even close to perfect but I love it! I may have cut the shelves wrong and put them in backwards or messed up a pilot hole or two but I got the job done, finally. Oh and this table was based loosely off of the craft table on Anawhite.com. She has tons of amazing plans. I plan to practice some more with my woodworking skills and her wonderful plans.


Because I am such a newbie to working with wood I purchased two small bookshelves. I found these at target. While they weren't in the plans exactly they worked for me.  I wanted things open and easily accessible so I left the front shelves open and added extra support underneath them. It is wonderful to have such a large work surface. it will come in handy cutting fabric and using for my bookbinding. The shelves were more than sufficient for my storage needs. One side is dedicated to fabric and the other my bookbinding supplies. I need to make spool holder for the embroidery thread and then that shelf will be used for bookbinding supplies. Oh and did i mention Mr. Wonderful surprised me with an Embroidery machine!!!He really is my Mr. Wonderful.:)


I found these cute tiered stands at Walmart on clearance for 3 bucks! I knew they would be perfect for storage so I snagged a  couple.:) I found the adorable little buckets in the dollar section at Target. I couldn't resist them and bought a few for me and a few for the boys. 


Everything was moved around to house the large table. My sewing table found a new home under my pretty Cocoa Cola ladies. You can also spot a certain little someone trying to convince me to take the gate down so he can meddle.


I still need to find another solution for the computer/book station but this will work for now.  The table is quite short. Maybe some leg extensions.  I was marbling excuse the mess in the floor.

 
And last but not least I bought a folding table to house the new embroidery machine. I have shared it before but you can also see my scrap storage on the back wall. Shoe cubbies are wonderful for scrap fabric.:)

 
Here is a blast from the past of my humble sewing beginnings. I started in the closet in the room. It was the spare room with a craft closet.  Fast forward 4 years and it is a craft room with a spare bed.;)
 

Excuse the mess in this pic....I am sure I was mid project and we all know how messy creativity can be.:)
 
Hope you  enjoyed reading and  found some inspiration for things on your to-do list!


Linking Up!
 
TDC Before and After 

Becoming Martha

Friday, February 10, 2012

Furniture Makeover!!! Super Excited with this one!

Finished Product


So a dear family friend was downsizing and gave us a some furniture that they couldn't take with them. I went over to take a look at what she had and this little beauty was staring me in the face. Sure it wasn't pretty at the time but I could see past all the ugliness and knew that beauty was just beneath the surface.

Original piece minus a drawer that was sitting in the floor. Ignore the horrible garage floor. It is a terrazzo floor and the previous owner was a mechanic. We have cleaned them endlessly but oil stains are not easy to get off a white floor. I really should pressure wash it again. If you know of any tips for cleaning this floor I am all ears.


Now I say we because Mr. Wonderful really helped me out with this one. We removed all the hardware and gave it a good clean. I sanded it pretty well and Mr. Wonderful fixed the bearings on the bottom drawer for me.


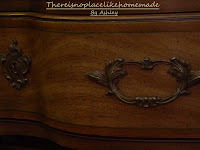
I was a little disappointed to find out that it wasn't really wood. It seemed to be some sort of laminate over wood.  The handles were in horrible condition. I had planned on just cleaning them really well and spray painting them with a Brushed Nickel paint. However, Mr. Wonderful had a better idea. I got my first lesson on the wire wheel and the hardware came out better than I could have ever imagined. Now don't go out and use one if you have never done so. Have someone there with you who knows how to use the machine and where the proper safety items....goggles and such.

I probably should have been wearing gloves. Not my greatest photo and no my tummy is not that big. The machine was kicking up some pretty good air and blowing my shirt up like the Stay Puft Marshmallow man.

My lesson. Really make sure someone is there that knows what they are doing because this machine is no joke. It can and will hurt you.


I can not believe how thay cam out. Here is a side by side view of before and after.


 Isn't that just crazy! I am so glad Mr. Wonderful was there to stop me from spray painting them.Now the handles were a little trickier because of the curves. For the spots I couldn't get with the wheel I just used a small wire brush and a whole lot of elbow grease. ;) Placing them in the vice really kept them steady while I brushed. I also wrapped the clamped piece in a clothe so the vice wouldn't do any damage to the handle.


After everything was painted and polished. I put a few coats of sealer over everything. Even the handles got bout 3 or 4 coats. This was our finished project. It now greets visitors in our entry. It is still lacking any real sort of decor on top but we have two sets of small hands that love to meddle. Especially if it is breakable. The phone is in the middle like that so they can't reach it. I love my little meddlesome monsters! ;)


I am not sure if I am crazy about the black stripe. I was following the original paint job. I think I may need to paint it silver or scrap it all together and maybe do a floral stencil around the edge. What do you think?


I am over the moon about the hardware. I LOVE it! The whole piece is awesome. I love the lines and all the little details. This my kind of furniture. Plus I got some new tricks up my sleeve thanks to Mr. Wonderful.

Now to finish the bookshelf that is taking up space in the garage. I really do love making over furniture! :)

Happy Friday Everyone!
Have a wonderful weekend!


Linking Up!

Laugh, Love, & Craft
http://www.skiptomylou.org/2012/02/06/made-by-you-monday-85/

Funky Junk's Saturday Nite Special
UndertheTableandDreaming


Saturday, November 26, 2011

Front Entry Facelift!


My front entry is now one of my favorite places. Before I gave it a new look it was a sad, dreary place. All that lived there was a tired, washed out rocking chair I got at a rummage sale for 15 bucks. While checking my mail one day I realized this is the first impression you have of my home and knew right away I needed to fix this. I am also painfully aware that my house needs a paint job. We purchased a fixer upper and almost everything needed to be redone....this is on our long list. ;)


This was it before, minus the table....sad right. :( I sanded down the chair really well and cleaned the daylights out of  it. Then gave it a couple good coats of paint. I used "Gentle Rain" by Behr. It is a  beautiful blueish gray. So when all was said and done I had a beautiful chair but it still needed help.

We had just painted our patio and gone through all the planters and little tables we had. I came across this neglected little stand and knew it was perfect. Sorry it isn't a great pic but it I (being my forgetful self) forgot to get a good pic of it.


I gave it a good cleaning, sanded the rough spots, and cleaned a little more.
The top was a pretty washed out and dirty. I gave it a good scrub and went in search for my spray paint colors. With a little paint and painters tape this is what I ended up with. I am very happy with how this dreary little table came to life. I used aqua, red, and white spray paint.


 I also added a pretty white planter found at a garage sell. Do you like my pretty mums? So what do you think? I am in love. I sit and read my mail here while watching my boys play. It is wonderful.  Just remember next time you come across a "seen better  days" item in or around your household take a second look ....it could be your wonderful.


Linking up with ... Beneath My Heart


Funky Junk's Saturday Nite Special

Tuesday, October 25, 2011

Pier 1 Inspired DYI Glass Knob Wall Hooks


A good friend was telling about these wonderful wall hooks she had seen at Pier one. They were beautiful but a little pricey if you wanted enough for everyone in the house. So I decided to make my own. I am not sure if these are the exact ones she saw but these are the ones I liked on their website. I really loved the hardware on these.


Shutter Wall Hooks


Here is my finished product....

Now it isn't exactly the same but I love it!
It more than serves it's purpose and it only cost me  28 bucks to make.

Want to know how I did it? Here ya go!


What you will need:
Wall hook or hooks of your choosing-preferably wood or something soft you can drill though with enough spacing for knobs.
Knobs of your choosing and enough that your space will allow for.
(I only had room for 2 Knobs)
Power drill
Drill bit slightly larger that your screw for the knob
Tape measure
Marker or some sort of marking tool

I found these wall hooks on clearance at Lowe's for 15 dollars. I absolutely love the look. 


I also found these knobs in Lowe's for around 4 dollars each.
If you can't find them in your local hardware store check the thrift shops. I actually went to a thrift store first but a lady had been in just before me and cleaned them out of all glass knobs. :( Boo! Luckily I found some at Lowe's that were big enough. i am sure you could probably find them online as well.


Now take your hooks and decide where you want your knobs to go. I measured between each hook and just put them in the middle of that measurement. Mark your spots and make sure they are even. Mine were not in the pic but I did fix that.


Next, again make sure your bit is slightly larger that your screw.


Now drill your holes where you marked your spots. Once you are done and happy with their location apply your knobs. Mine had a screw that went through the back of the wood and attached to the knob on the front. I used the screw driver attachment on my drill to make sure the knobs were nice and snug.


There you have it! My new wall hooks for 50 dollars less. I am really happy with how they turned out. They really help my entry way as we don't have enough space there for a mud room or area for that matter.

Tuesday, September 20, 2011

Old furniture gets a new look!

I have been feeling like my house needs a face lift lately. Being a stay at home mom I try to save where we can so I got creative. We bought an older home that needed a lot of work so we painted our whole house (literally...even the ceilings). Needless to say we have a lot of indoor paint leftover. We have been handed down some older unwanted furniture. They weren't exactly our style so I spruced them up a bit. Here they are....


I carried everything into the garage and went to work. Carefully I removed any hardware and gave them a good scrub down.  Then proceeded to sand the heck out of them. Luckily we have an electric sander...it really helped me out.


Once they were all sanded I gave them one final clean and then a couple coats of paint. Now I should have used primer here but we were fresh out. I was trying to use only the things we had on hand. It worked just with an extra coat or two. I also spray painted the old brass handle for the drawer.


And Viola! It is amazing what a fresh coat of paint can do. This is now in our dining room. I am still playing around with the pretties on top of the little stand but I think it has found it's home...for now ;) I filled the open cubby of books for the boys to give them something to do while waiting for dinner. I also utilized the drawer for printer and photo paper. I really love this piece now. The paint on this is Gentle Rain by Behr. There are 2 rooms in my house this color and I can't tell you how calming this color is. I love it!


This next piece is just a small bookshelf that will most likely hold some of my fabric in my sewing room. It will be bare for a little while until I finish redoing the sewing room. I don't know why but lately I feel like overhauling my whole house. And it feels good to see progress. This color is a color I used in the nursery for the sky on the Dr. Seuss walls it is called... Blue Marine by Glidden. My sewing room colors are different shades of blue, turquoise, and a plum purpley color. I was walking in target and saw a pillowcase on clearance that spoke to me. Those were all the colors in the pillow case.


So the next time you come across an unattractive piece of furniture in your home give it a second thought before tossing it out. You never know it could be a real gem. ;)
Related Posts Plugin for WordPress, Blogger...