Showing posts with label recipes. Show all posts

Sunday, September 23, 2012

Remember me.....an update and some herb drying tips.:)

Greek Basil
 
So I guess I took a little break. Summer brought many fun new adventures for us. We started some new fun activities, made new friends, and attempted to grow some vegetables. ;) We fill our days with play dates, story time, and family nights. Not that I don't like blogging but I think it was a nice change. You know how sometimes you get so involved in something you forget to look around. Well I have been looking around. These moments are precious. My boys are 2 and 3 and I don't want to miss this. :) So my post will be here just in between the all the little moments. I wanted to share a few picks with you guys.


Dill


While our vegetables weren't very bountiful (we are working on that) our herbs were. Our little herb table was full of dill, basil, parsley, chives, mint, and onions. We also have a big rosemary bush planted in the yard. When the herbs are ready for harvest I just wash them really well and hang them to dry in a dark, dry corner in my kitchen. Once they are dry I store them in a zip loc baggie until they are ready to be used. You get the best flavor if you wait to crush them right before using them. Hopefully next year we will have a better vegetable turn out.


Basil Harvest
 
Hoping you all had a wonderful summer!

Thursday, April 19, 2012

R2D2 Cake!!!!


So my little K turned three! When asked what kind of party he wanted he replied Star wars. I couldn't have been happier!!! We love Star Wars! So he and I looked at a few cakes and such floating around blog land. I have to admit my heart may have skipped a beat when he picked this one from the Baked by Jen blog. She did an amazing job that totally trumps my cake! My first thought was...Oh No ...how will I ever pull this off. I have never made a cake like this but I guess there is no time like the present. I put on my big girl panties and did what any Mom would ....Asked for a million opinions from the Moms on my crafting board! LOL I finally decided on a plan and found an awesome recipe from Bakerella  and started my cake. By the way that recipe is to DIE for!!! We just used the cake and filling recipe....the cake was super moist and the filling was Delish!

Below you will see the base of R2D2. I just baked 4 eight inch rounds, stacked, and iced them. I made sure all my layers were even and uniform...there is nothing like a lopsided cake. Then I added my filling, and did a rough coating with the butter cream. I also added 5 small dowels so my cake wouldn't droop or fall in any places. I put it in the freezer briefly to firm up while I made another batch of butter cream. The outside layer  just got a good coat of basic butter cream. I have the recipe Here at the bottom of my Monster Birthday bash cake. My guys aren't too fond of fondant so I only used it for the detailing and to cover my rice cereal treats for the head.


OK I have to apologize here....at this point my hands were covered in coloring, rice cereal treats, and butter cream so the photos are few and far between. For the head I made a batch of your regular rice crispy treats. The only thing I did differently was used a little less butter so the treats would be a little stiffer. To get the shape of the head you simply fill your cake pan with the treats and shape into a dome. If you had a bowl the same diameter of your cake you could use that too. Just make sure to spray a little cooking spray on your bowl or pan so they won't stick. Once it was shaped and had stiffened up a bit I covered it with a nice layer of butter cream and put it in the freezer to chill.

Now since I have just told you about the head I should also tell you about the legs since they are also made of the rice cereal treats. For the legs I just measured the height of my cake and shaped the treats into 2 T shapes just a couple inches shorter than my cake. After all your treat pieces have been covered in butter cream, and set, cover them with fondant. The head is covered with black and then painted with luster dust. Did you know if you don't have Vodka on hand to paint the luster dust on you can use the same clear vanilla extract you used in your butter cream? Oh how I love google! As you can tell from my paint job this is my first time using luster dust. A little good to know.....it takes it a little while to dry. LOL My other fondant pieces kept sliding down.


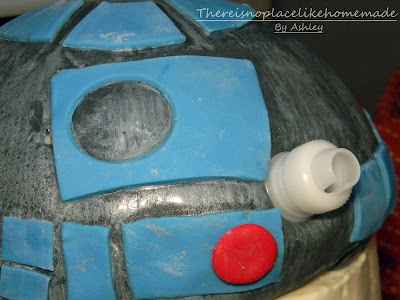
I googled the heck out of R2D2 images and  drew out my detail pieces on paper. Then I simply traced it out in my fondant. Now he is not perfect and by no means an exact replica but I was happy with how he looked so I went with it. For the head a large glass gave me the perfect circle and I just cut it in quarters and cut a smaller circle out of the middle with a small round object I had in the kitchen. I forget now what it was but I also used an empty spice jar to cut out the large lens area on the front of his head. Take a look around your kitchen....I bet you will find a few things you can use.
I


For his little eye thingy I just used a piping coupling. Later I filled the spaces where there were lenses with black piping gel.  The head and body seam was a little sloppy so it was doctored up with a little blue fondant stripe right over the seam. For his legs, I just covered them in white fondant and attached them with dowels. I also colored just a small amount of fondant orange and made some little connector wires for his legs...just like the inspiration cake. I did, however, forget the little leg under him. I realized this as I was finishing him up ....Of course! I never see these things until I am almost done. Oh well my R2D2 in in rest mode! LOL


My little R2D2 was a hit!! K was over the moon for him! Nothing could have made me happier than seeing his little face light up at the sight of his cake. For the candles we used the sparkling candles. With R2D2 I always remember him shooting that little spark so what better than sparking candles. it was so much fun making him and to be honest no where near as scary as I thought it would be. I couldn't be happier with the outcome!!! So, what do you think? Would George Lucas be stoked or probably scoff at my attempts of his masterpiece? I would hope he would be stoked.;)


The next time you are faced with a crazy, scary task remember just have fun with it. If it is coming from love that is all that matters! The first step is to just start. Feel free to ask any questions in the comments or my email address.


Linking Up!!

http://www.shineyourlightblog.com/2012/04/mangia-mondays-white-sangria.html


Laugh, Love, & Craft

Skip To My Lou


I Heart Nap Time


Funky Junk's Sat Nite Special


Thursday, February 2, 2012

Almond Joy Whipped Cream!!!


So like most things found in my cooking this was completely on a whim. I had made the Chocolate Cream Pie from this book.

 Martha Stewart's Pies & Tarts

It was Delish!! The only thing I changed was the pie crust and the chocolate. I used a plain pie crust instead of a chocolate wafer cookie crust and semisweet chocolate instead of bittersweet.

Now for the Pièce de résistance.....how I made the Almond Joy Whipping Cream. It is quite simple and I am sure it has probably been done before. You make the cream the same way you would normally... 1 cup of heavy cream beat until soft peaks form and then add 1/4 cup of confectioners sugar. This is where I got a little creative. I thought ok  I don't want the same old cream, lets mix it up a bit. So at  this step I got out the Almond Joy coffee creamer I picked up the other day and added 2 tablespoons slowly to the bowl. Then I just beat until stiff peaks were formed. I was SO GOOD! Not to mention it complimented the chocolate very well.  It was simple and quick. Only one extra ingredient and no extra time or steps spent.


Almond Joy Whipped Cream

1 cup Heavy Whipping Cream
1/4 cup Confectioners Sugar
2 Tablespoons of Almond Joy Coffee Creamer

Beat heavy whipping cream until soft peaks form. Make sure mixer is on low or the stir setting and slowly incorporate confectioners sugar and coffee creamer. Once incorporated beat until stiff peaks form and chill or serve. DO NOT OVER BEAT. If you over beat your cream turns stiff and grainy.

I hope you enjoy this! We sure did!!

Linking Up With....

Friday, January 20, 2012

Baked Buritos...Yum


My Baked Burritos were a product of a craving and circumstance. ;) I saw someone making Taquito's on the food network and was drooling all over the tv. So off to the fridge I went to see if I had the stuff to make them. To my disappointment I only had a whole frozen chicken and no time to thaw, cut, and cook. Guess what I did have the stuff for. Yep, Burritos. So that is how Baked Burritos came about. They were so yummy. I thought I would share.

For the filling I sauteed half a large onion chopped, a couple Hungarian Wax peppers diced, about  a pound of ground beef and some taco seasonings. For the ground beef I love to get the market ground beef. It is all the left over bits from the roast, steaks, and so on that the butchers grind up and sell later. So it is good cuts of meat that were not used due to size or shape. It is usually a little cheaper than ground round and doesn't contain a ton of fat. With the pepper if you don't want really spicy...remove the seeds and ribs. Oh and if you didn't know peppers are really easy to grow. I have two pepper plants on my patio that have been producing since last spring!

For the seasoning I cheated and used the Cheesy Taco mix by Old El Paso. They are quick, easy, and I usually always have one on hand. You could totally make your own seasoning. Maybe some chili powder, cumin, cayenne, you get the gist. Whatever you like. I also added some black beans and black olives to my mix. Once the meat is browned and everything is incorporated well. Spoon a couple tablespoons onto a burrito shell. Add a little cheese and wrap tightly. You can wrap these however you choose...open ended, like a burrito, like an egg roll. However you choose just make sure when you finally put them on you baking sheet to put them seam down. I personally prefer the egg roll method. Brush the whole burrito well with canola oil or veg oil of your choosing. Bake on 500 degrees for about 8 to 10 minutes. Take out and enjoy all the crunchy goodness. Really they turn out super crunchy with out all the fat of frying. I also made a yummy dressing I found Here at Skip to My Lou. The link is to a Southwestern Summer salad (which is delish by the way) you can find the recipe for the dressing under the recipe for the salad. I shredded some lettuce and made some yummy rice. My guys loved this and voted to put this in our weekly meal rotation.:)


I hope you guys try it and enjoy it! If you have any questions feel free to leave me a comment. Happy Eating!!!

Linking Up With....

Shine Your Light's Mangia Mondays Blog Hop


Link Party

Sunday, November 20, 2011

Monster Birthday Bash!


My little monster E just turned 1!  His birthday is right before Halloween so we decided to have a Monster themed party.


I had a vision of what I wanted the cake to look like and I am pretty happy with the finished product.  I baked a chocolate pound cake in a 13 x 9 pan and carved out my monster. I used a star tip (17...I think that is the number of the one I used). Yes, it takes forever piping all those little stars but I love how it looks when you are done.I used just your basic butter cream recipe with food gel coloring.  His hat was the smash cake. We had a great time and my little monster really enjoyed his party. 


We had some yummy cake pops.  I found this site to be most helpful when making my cake pops...Bakerella These were a big hit. Inside there was chocolate cake with strawberry frosting.


I couldn't find any invitations I liked so I pulled out some card stock and made my own. I found the shape of my monsters from a fabric sample. I didn't use any special machines (although I would love to have a Silhouette... Ahem Santa) I simply drew out a template of each monster and used it for all the cards.  Excuse the roughed up invites. K and E decided these needed to be dissected and inspected. Of course they took the only one I kept for the scrap book and destroyed it. I was able to salvage it, thankfully. ;) Little monsters.


For favors we did Jolly Rancher Lollies with all kinds of candy pressed into the lollies. Somehow I don't have a photo of these but they were awesome. I have a few left so I will take photos and either update this post or do a new one.


During the party I was running around playing hostess and wasn't in control of the picture taking. Unfortunately there aren't many shots of the decor but I made some of these from the Martha Stewart site. We also had a frankenstein, mummy, monster,and a scarecrow one. They were super cute.

Pic from marthastewart.com

I also made this cool bat mobile from the Martha site to hang over the table...
Pic from marthastewart.com


We had an awesome time and E had a wonderful birthday. K has already informed me that he wants a birthday soon and he wants it to be Mickey mouse. LoL

I also wanted to add if you have never tried homemade butter cream, you should. It taste much better than the can stuff. IMO. Here is the recipe if anyone wants to try it. This is for the true white icing. The other method for making butter cream uses 1/2 cup butter and 1/2 cup shortening in place of 1 cup of shortening and no butter flavor.

Butter Cream Icing
1 cup vegetable shortening
4 cups confectioners sugar
1 tsp of clear vanilla extract
1/2 tsp butter flavor (clear)
2-4 tablespoons milk

Place shortening in the mixer and mix on love for a minute just to break it up a bit. Add your vanilla and butter flavor. Set mixer on low and  slowly add your sugar. Once it is all in the bowl and mixed turn on medium until mixed well. It will be quite stiff. Add 2 tablespoons of milk and beat on med., scraping the sides often until you get a fluffy icing. You made need to add a little more milk. If so, add 1 tablespoon at a time. Keep refrigerated when not using it or cover with a damp cloth. Again is the pure white recipe used for adding color. I have found this to be the best method for getting better color.
This will keep in the fridge for about 2 weeks in a sealed container.


Sunday, November 6, 2011

Roast Pumpkin and Pumpkin seeds! Yum!


I can't remember where I seen or read it but I saw method for roasting Pumpkins whole. Of course I had to try it. It was really easy and the results were really good. I had purchased two pie pumpkins when we went to
our local pumpkin patch so they were my frankin-pumpkins. ;)

I washed them very well and coated them with Canola oil. I placed them in a 425 degree oven for about an hour and 15 minutes. Times may vary depending on the size of you pumpkin(s). Now you need to make sure to put them on one of the wire racks of your oven and place the other rack under them with a cookie sheet lined with foil to catch any dripping juice.

They are done when you can run a knife through and the flesh is soft like butter. Now I don't know if I cooked mine a little to long but the skin was shell like and very hard so it took a little muscle to get through the outer shell to check the flesh. When they are done let cool a little and slice in half. Be careful there may be some steam. I scooped out my seeds and then my flesh and was left with these wonderful shells. Save these.  I am thinking they may make some cute decor with a little work. That will be another post.
~Updated~ It is bad news for these pumpkins. I had to throw them away.
:( I think I should  have really scrubbed them out with a Brillo pad and let them dry in the sun. I thought a light scrubbing would do and just let then dry on the counter. Well not so much. They started to get a little moldy and I decided to pitch them.  Maybe next year. I will really scrub them really well and either dry them in the oven or if it is sunny out on the patio.

Here are my yummy roasted seeds. Cook on 400 degrees for about 10-20 minutes depending on how many seeds you have. I coated them in 2 tablespoons of melted butter and a little kosher salt. They were ready about 15 minutes after I put them in the oven. Be careful they burn quickly.


My two small pie pumpkins produced one gallon zip loc baggie.
For best results puree your pumpkin before using. keep in the fridge until ready to use or place in your freezer for future use.


Happy roasting!

Tuesday, November 1, 2011

~Making colored sugar with gel food color~


 For the upcoming holidays I thought it would be fun to do holiday sugar. I usually have play dates every week or so and almost always have the in-laws over so it is nice to offer festive sugar with their coffee. It was such a hit I  ran out with out taking a picture of it in my pretty sugar jar. I plan to make some more soon and will add a pic then.


To get the above affect you will need:
Food coloring
( I had gel on hand but I am sure any food color will work....just read the color chart on the back)
Sugar
Cup, Bowl, or Zip lock baggie
Spoon

Pour your desired amount of sugar into a cup, bowl or zip loc. Now also keep in my the amount of sugar you use will determine the amount of food coloring you will use. I have a small sugar dish so I didn't need a lot.


Reading the back of the food color box I got the right amount of red and yellow to make Orange and then the amounts for green. If you are using gel and a bowl or cup just use a spoon like this. If you are using a bag place the gel directly onto the inside of your bag. Just keep in mind you may need to add more color depending on the amount of sugar.


Then just mix well and pour onto a flat surface to dry.  There you have it, festive holiday sugar! I think I may make more for Thanksgiving in similar colors....maybe brown, red, and orange. Then Christmas colors....red, green, and white. Simply, easy holiday decor. Trust me all your visitors that come over for a cup of joe will enjoy this fun treat!

Tuesday, October 25, 2011

Ham, Scallion (green onion), & Cheese Holiday Dip


Holidays are in full swing which means good food will soon be all around us! There are certain things I only make at holidays. I save these recipes for special occasions and holidays because they bring back precious memories of family and time gone by. This recipe is one my Mom and Dad have been making since I was little that I now share with my family. It is really simple with only three ingredients. Don't be fooled though, these three pack a wonderful punch of flavor.

Supplies:
2 packages cream cheese- softened
2 cups of thinly sliced ham -chopped (more if you like it)
1 bunch of Scallions-chopped (more if your like me ;))
I happen to have a plant on my patio.....a good handful or so will do. This just depends on you taste for the onion.

Place all ingredients together and mix well.
Now here is where my mother and I differ. She likes to mix this with her hands.....I do not. I put this in my mixer with the paddle attachment and let it do all the mixing. This is up to you, just as long as it is mixed well it doesn't really matter how you do it.


Now once mixed form a ball or round shape for easy dipping and chill for at least an hour. Overnight is best ...all the flavors get happy and marry.;) Now enjoy with any cracker or dipping utensil of your choosing. I prefer whole grain crackers myself. I hope you enjoy this as much as we do.


Are there any dishes you save just for certain occasions? If so, do share...I love a good recipe! ;) Happy eating!


Related Posts Plugin for WordPress, Blogger...