Thursday, September 29, 2011

Halloween cookies and recipe from Hayley @ Welcome to the Mouse House

The other day will catching up on my blog reading I ran into a yummy cookie recipe from Hayley @ Welcome to the Mouse House (this is the link directly to her cookie post with recipe) It was  so yummy!   K and E really enjoyed making Spooky Halloween cookies!


These were so fun. I am thrilled that fall is here. It brings Halloween, Thanksgiving, and then Christmas! Yay! These are my favorite holidays. Soon I will have a DIY baby costume to post. I just need to finish sewing it. It is so cute! Can't wait to share with you guys. Anywho check out Hayley's blog and here delish cookies. She also has a ton of awesome diy and crafty goodness I know you guys will love! Until then happy baking!


P.S. Notice that there aren't any sprinkles on the actual cookies. Yeah we forgot to put the sprinkles on before baking. K still wanted to shake the sprinkles so I let him anyway. Sprinkles are always fun....to kids that is. I am still finding them all over my kitchen! :-@


Construction paper art and easy display!


Today K and I made fun, fall pumpkins. He is now old enough to actively use the sick glue and direct me in the look he is going for.  So after we finished I went to put them on the fridge....not happening. ;) If you are anything like me your fridge is already full of chore charts, weekly menu plans, and various art work. So plan B. I decided to add an extra piece of construction paper as a support and display them on the table. I haven't decorated for fall yet so I got 2 two birds with one stone. If you are interested I took picks along the way and have step by step instructions to share! 

Here is what you will need:
Construction Paper
Stick glue
Scissors
Pen
(or in my case my tailors chalk K insisted on using)
One creative little mind to produce awesome artwork


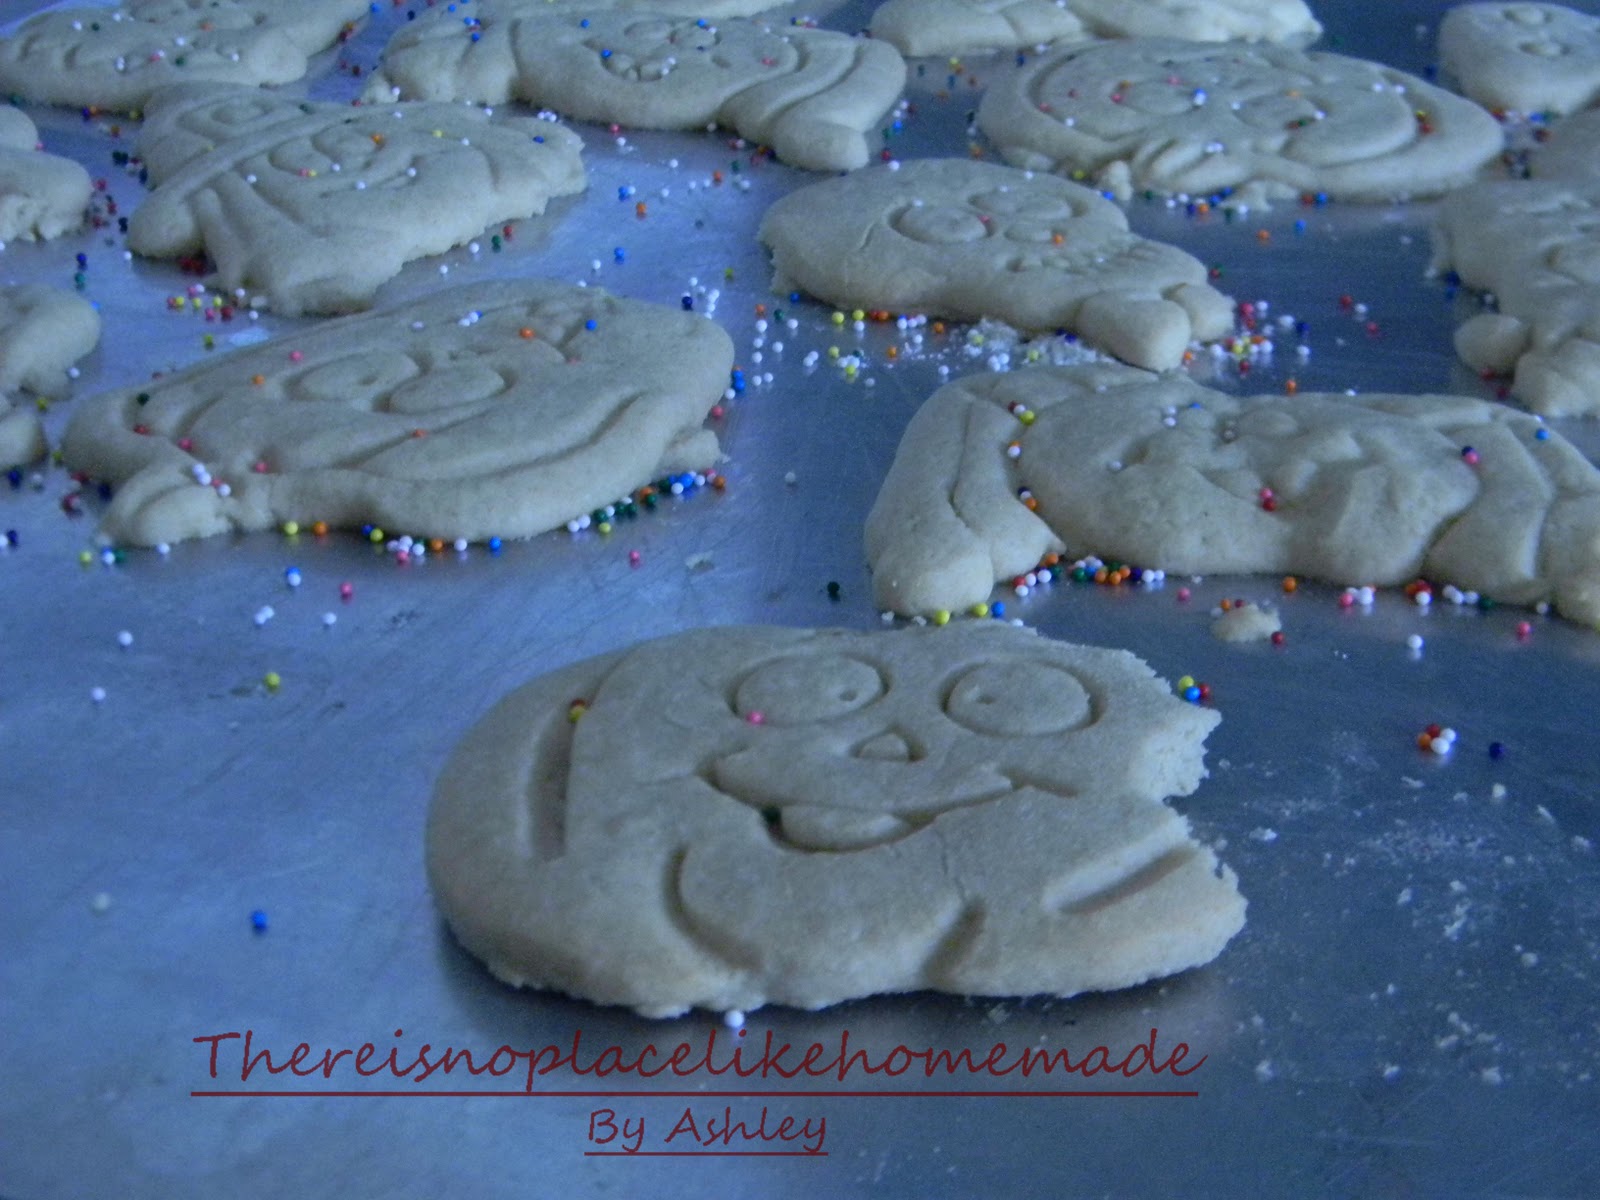
We set up a little snack station and started creating. He was very sure about the shapes he wanted on his pumpkins. It was so cute. He would say rectangle eyes for this one and a triangle nose for this one. My kids amaze me every day with how much they are changing, growing, and learning.


Helpful tip: When cutting out facial features trace your shape onto the cutout paper to help get the proportions right.


Here we have one silly pumpkin....glasses and mole all at the request of the little artist. I love it! The mustache mouths were moms idea....my picky artist let me have that one. When I suggested circle eyes he wasn't having it. HA!


Here is how I constructed the display support for the art. Cut out a wide piece of your construction paper. I cut from side to side and half as tall as my pumpkin. Then crease the middle.


Folded in half, cut an angle from the tip of open end up to your folded end. You just want a slight angle so it will stand up. I didn't get it in the pics but cut the angle completely off.


Then on the open end fold about a half an inch of the paper back on both sides.


Kind of like little wings. These are what you will glue to your artwork.


Dab your stick glue onto the folded flaps that are facing out in above pic.
Here is a photo of flaps with glue.


Then press flaps to the back of your art work and press well. Let dry


Ta-Da! Your done! Beautiful artwork on display. My little guys was so thrilled with his work. Every time someone comes into the house he takes them over to see his masterpiece.


Here is a side view and you can see how it  works. Very simple and easy. Plus it frees up my poor fridge. I hope you and your little artist create some fall pretties to display!


Friday, September 23, 2011

Auntie Anne's at home baking kit!

Did you know they sell an at home pretzel baking kit? Am I out of the loop? Has this been available all this time? I had no idea until the other day. I secretly jumped for joy in the store when I saw this...


I was so ready for a nice yummy pretzel that I didn't have to go all the way to the mall for. While going through the instructions I came across a thing of absolute pretzel heaven...How to make your own pretzel dogs!!!! I love those things! Now I could make them at home and a healthier version. I used turkey dogs instead of real hot dogs. We love turkey dogs by the way. It was unbelievably easy to prepare the dough. From start to oven it took 1 hour and that is with letting the dough rise for 30 minutes.


Here are my lovely pretzel dogs. My guys loved them. I made a cheese sauce and K had a blast dipping his.  Of course he had to have his own dipping bowl....he is an infamous a-million-licks-dipper. Trust me you don't want to go anywhere near dip that child has touched.  ;)  I love him to pieces but he is all boy. He can't help himself.


I had a package of 8 turkey dogs completely wrapped and still had dough left for 3 big salted pretzels, 3 sugar/cinnamon ones and one baby sugary one for E. Oh and it comes with the salt and cinnamon sugar packs.


I am sure it isn't brain surgery to make your own pretzels from scratch but I really like this because it took all the guess work out of it.

So if you haven't seen this in stores yet and love Auntie Anne's pretzels you should grab a package. Happy eatting! ;)

Thursday, September 22, 2011

Karen's Italian Wedding Soup

Karen from Little Red House Designs blogged about her homemade Italian Wedding Soup. One look at that soup and I knew I had to try it. It was AMAZING! Here is the finished product...


Here is the link for Karen's post on how to make this scrumptious soup Karen's Italian Wedding Soup

Now in her recipe she says you can use any homemade meatballs. So I used my chicken meatballs. I thought I would share that recipe with you guys. They are supper easy and very versatile. I use them for spaghetti, meatball subs,  Swedish meatballs, and now Italian Wedding soup.

Chicken Meatballs
1 pound Ground chicken
1 cup shredded mozzarella cheese
1/4 shredded Parmesan cheese
1 cup breadcrumbs
( I prefer to make my own but the choice is yours)
1 egg, beaten
Any Italian seasoning you like - about a teaspoon or so
(this is to your liking..I usually just do some oregano and fresh sweet basil)
Kosher salt & pepper to taste
Optional..Chopped Roasted Red Bellpeppers

Mix all ingredients in a bowl (I use my hands here) Form into meatballs and lightly brown on all sides in a shallow pan with a little cooking oil.  I use canola, and then slow cook in sauce or soup of your choice. You could also bake these...I am unsure of temps and time but I am sure it is possible. Whichever method you choose make sure they are done...they are chicken after all. I prefer mine cooked low and slow in sauce or soup. These are great in the crock pot (browned first of course). They are so tender and filled with cheesy goodness.

I will note this about the soup....Karen warned me. She said to make sure to make the meatballs on the smaller side. I think I still made mine to big. Next time, for the soup, I will only use a little over a half a teaspoon for each meatball. Oh and because I love spinach I added extra to my soup. Horrible secret.... I have had it for lunch and uh...breakfast for the last two days. Isn't that horrible... breakfast. I couldn't help myself. LOL It is SO GOOD!

So thank you Karen for sharing an awesome recipe! Everyone should check it out and her blog. She has some really yummy recipes. ;) 

~Linking up with~


Tuesday, September 20, 2011

Old furniture gets a new look!

I have been feeling like my house needs a face lift lately. Being a stay at home mom I try to save where we can so I got creative. We bought an older home that needed a lot of work so we painted our whole house (literally...even the ceilings). Needless to say we have a lot of indoor paint leftover. We have been handed down some older unwanted furniture. They weren't exactly our style so I spruced them up a bit. Here they are....


I carried everything into the garage and went to work. Carefully I removed any hardware and gave them a good scrub down.  Then proceeded to sand the heck out of them. Luckily we have an electric sander...it really helped me out.


Once they were all sanded I gave them one final clean and then a couple coats of paint. Now I should have used primer here but we were fresh out. I was trying to use only the things we had on hand. It worked just with an extra coat or two. I also spray painted the old brass handle for the drawer.


And Viola! It is amazing what a fresh coat of paint can do. This is now in our dining room. I am still playing around with the pretties on top of the little stand but I think it has found it's home...for now ;) I filled the open cubby of books for the boys to give them something to do while waiting for dinner. I also utilized the drawer for printer and photo paper. I really love this piece now. The paint on this is Gentle Rain by Behr. There are 2 rooms in my house this color and I can't tell you how calming this color is. I love it!


This next piece is just a small bookshelf that will most likely hold some of my fabric in my sewing room. It will be bare for a little while until I finish redoing the sewing room. I don't know why but lately I feel like overhauling my whole house. And it feels good to see progress. This color is a color I used in the nursery for the sky on the Dr. Seuss walls it is called... Blue Marine by Glidden. My sewing room colors are different shades of blue, turquoise, and a plum purpley color. I was walking in target and saw a pillowcase on clearance that spoke to me. Those were all the colors in the pillow case.


So the next time you come across an unattractive piece of furniture in your home give it a second thought before tossing it out. You never know it could be a real gem. ;)

Faux Chenille is in the air~~~

Faux Chenille is in the air right now. Especially among my favorite sewing mamas (you know who you are). I had long ago decide to jump on the band wagon. I have had all this fabric set aside for about 6 months just waiting to be put together. I actually swore I would never make one again after my wild adventures over a year ago with my first faux blanket. That was on my old machine. My new one handles it perfectly and now I don't mind sewing them.

It all started with this Spaceman flannel that K saw in the fabric store one day.He found it in the remnant bin and would not leave the store without it. So i decided to pick up some other flannels while I was there and make a soft, cuddly faux chenille blanket for him. Now that E is much more independent I was able to get it all put together.

I spray basted all my layers and went to town sewing all my layers. If you aren't familiar with a faux chenille blanket or how to make one I am going to include a few links to help you with creating your own. I would have but seeing as I made mine here and there I didn't take the proper photos for a tutorial. Here where I first learned of the blanket .... Aesthetic Nest and here are a couple others ..  MADE and Mercys Mom. All wonderful tutorials!


Don't you just love the soft glow of a sewing machine light.....ahh, I do. ;)
 Now if you aren't familiar with the faux chenille technique I will try to explain a little. You sandwich 4-5 layers of cotton or flannel fabric (you will need a fabric that will fray). Use a good spray baste to make sure your layers stay together. Mark a center line diagonally across your fabric and begin to sew down that center line. You then go out about 1/2 an inch and continue to sew lines parallel to the center diagonal until you have covered the whole blanket with the lines. After you have finished sewing you cut in between all the lines making sure to only to cut the 3or 4 layers of flannel or backing. You do NOT want to cut the front. Also be careful when cutting in the channels because it is easy to catch the front fabric.  


After you are done with all your cutting, square up your blanket, bind it and throw it in the wash a couple of times. You will come out with one of these little beauties!I love how it turned out. The colors worked perfectly together. Plus my boys both love it and all its cuddly goodness.


Here is a close up of all the frayed goodness on the back. It is oh so soft. It completely warms my heart to see one of my little guys dragging this thing around. I  love it when they like what I have made for them.


Here is the first Faux chenille blanket I made. It was for a friends little girl. I could not find the right combo of flannel at the fabric store for this one.  I purchased a package of coordinating receiving blankets that matched perfectly. 


Now fall weather is creeping up on us and these little cozies are just the ticket. Whip one or two or 10 for the little warm loveys in your life!;) Happy Sewing!

Monday, September 19, 2011

Thank you Followers!

I just wanted to say thank you to all my followers. I never thought anyone would take an interest in what I had to say or contribute to blog world. So I am very thankful for all my wonderful followers. In the past few days I have a gotten a few more and just wanted to make sure you all know that I appreciate you! :)

I WON A GIVEAWAY!!!!

Oh my gosh....I can't believe it! Every now and again I will enter a giveaway. I never usually win anything but not today. I felt like Elle Woods in Legally Blonde when she was reading the intern list... you know she yells " ME!" ;) I entered the Sewing with Oilcloth giveaway on Sew mama sew. It was for a new book by Kelly Mcants...Sewing with Oilcloth.

She is also going to include some fat quarters of oil cloth and laminated cotton. I am just beside myself. I still can't believe I won. Yay!  I hope to have some oil cloth goodness posted soon. I also paid a visit to her blogs Modern June and Oilcloth Addict. They are very cute and full of craft goodness. You should check her blogs and book out. I am now happily following both!
As for the absence of my posting lately....it is all my cameras fault. HA! Apparently rechargeable batteries are only good for so long. After a dozen tries of recharging Mr. Wonderful brings it to my attention that they may just be old and need to be replaced. for some reason i thought they would last much longer. So I got new shiny batteries and they are charging. As soon as they are done I should have few new post either tonight or tomorrow. Just to peek your interest...there might be a faux chenille blanket, a couple of very cute little table redos, a new/old fabric storage redo, and some other stuff stored on the camera that I can't remember or access at the moment. LOL
Hope to be back posting soon! A giant Thank You to Sew Mama Sew (whom I love by the way...check them out if you haven't already) and Kelly Mcants for offering such an amazing giveaway!

Monday, September 12, 2011

Award .....me!?! ....{insert blushing}

This morning I got a wonderful email from a lovely lady. Karen from Little Red House Designs chose me and 14 other wonderful bloggers to receive the Versatile Blogger award! I am tickled pink! When I started this blog I was completely new to blog land and had no idea of the greatness I would find here. I still can't believe I have followers...so an award is really blowing my hair back ;)
 

There are some Rules with this Award:

Rule 1: Thank the person who gave you the award. :) Plus Link back to them in your post.

A big Thank You to Karen @ Little Red House Designs !!! Karen and I started out around the same time and are part of the same crafting board. She has been so very helpful during my blog-learning-experience. Plus her writing is a wonderful slice of blog pie...enough to satisfy any readers appetite. From the stories of her beautiful girls and pup Nora to her wonderful recipes and crafty adventures. If you haven't checked her out you should! Thank You Again Karen!


Rule 2: Share 7 things about yourself...

1) I am a southern girl, I don't live there now, but was raised in Alabama.
2) Mr. Wonderful and I eloped in 2008 and didn't tell a soul! We have been together for almost 10 years now. Married for 3.
3) I have 2 wonderful little boys....K is almost 3 and E is almost 2.
4) I just started crafting in 2008 and most times have no idea what I am doing.
5)  My favorite subjects in high school were English and literature although it doesn't show in my writing. I have become quite lazy in that department.
6)I never knew I would enjoy blogging so much. I had no idea all the greatness blog land would offer and all the great friends  I would make;)
7) I have the life I always dreamed of. Growing up I never dreamed of fame and fortune. For as long as I could remember I have always just wanted a nice family. Now I have a wonderful husband, wonderful children, two unruly dogs, a great house, and more craftiness than I can shake a stick at. The icing on the cake would be to open a children's bookstore...maybe one day.


Rule 3: Pass the award on to 15 blogs (that were recently discovered - and contact them to let them know)
4) Crafts 4 Lily
5) Distant Pickles
6)Heidis Nest
7)Homemade From the Homefront
8) Knitty Brotz
9)Laugh Love and Craft
10) Naptime = Craft time!
11) The Chronicles of Mercy's Mom
12) The Pretty Bitty Blog
13) Traceyjay Quilts
14)Twenty Fingers And Twenty Toes
15)Styled Stitch

Be sure to check out all these blogs!! They are just like all of us and deserve the award too!

Ps. I wanted to note if I read your blog and it is not in the list...it is not because I don't love your blog. There were a few blogs in Karens list that I would totally added to my list had there been more numbers but I wanted to give everyone there chance to shine. So if Karen awarded you I left it at that. To me all the blogs in my blog list deserve this award so after you have read this list check out my bloglist. They are all awesome bloggers!!


Sunday, September 11, 2011

It still takes my breath away..........


Just the thought of the horrible tragedy that occurred 10 years ago still takes my breath. When I think of that day it is almost as if I am watching  a movie. That is how surreal it was. I was 19 and had just graduated high school. While home alone cleaning, I turned on the television to keep me company. I had no idea how much everything would change when I hit that power switch. I must have sat in that floor, broom in hand, for 2 hours without moving. Praying is about all I did, I was paralyzed by what was unfolding in front of me. To this day the emotion is just a strong as it was that day. Sitting here trying to write this I find myself wandering in thought....my mind keeps going to the families and victims of the attacks. It is a sadness that has no words.

So we want to send out our thoughts and prayers to all who gave on September 11th. They are always in our hearts. For the women and men who thought of their fellow man on the flights and shined with bravery in the face of peril. For the loved ones who were lost in the towers. For the brave service workers who gave everything to save who they could from the attacks. For all the families members who lost a loved one. And to our country, whom is still very much healing from this event. Your flame burns bright in our hearts and that is something they can never extinguish.

Photo by Amy Dreher
 Photo link... http://www.911memorial.org/photo-albums/photos-911-families
I thought I would share this photo. It is a photo of the survivor tree at the memorial site. The blooms are a wonderful sign of hope and rebirth from the ashes.

~God Bless America!!~

Saturday, September 10, 2011

Ooopps!

In case you are all wondering, yes my blog looks a little different. I was playing around with some page elements and accidentally lost all my color settings. AAAHHH! I tried to fix it and actually like it a little better. I am thinking of creating my own background. ~If time and children permit!~ I don't know we will see. Mr. Wonderful surprised me one year for my birthday with the Adobe Photo Elements 7 and I have just scratched the surface of it's abilities. Hopefully it will help me come up with some amazing creations for my blog.

I have some DIY furniture recreation post and sewing post coming up soon....stay tuned!! Have a wonderful weekend everyone!

Wednesday, September 7, 2011

Custom Crayons!!!

K is now almost 3 and LOVES coloring. Problem is we end up with a lot of broken crayons. This is a problem because E will eat anything that will hold still long enough. I am sure a bright, pretty crayon looks very appetizing to a 1 year old. So I have been collecting broken bits of crayon for a special project. Now for the life of me I can't remember where I first saw this but it definitely isn't a new concept. It has been around for a while. I went to the craft store and picked up a cute candy mold. I found a perfect car mold for my little guys. Now I forgot to take pics of the melting process but I found this tut with a few pics to give you an idea http://homemadebyjill.blogspot.com/2010/10/diy-molded-crayons.html  Homemadebyjill is an awesome blog by the way. You should check her out!  You start with an empty tin can and a simmering pot of water.  I made sure to get all the little bits of paper off my crayons. Then separated all my colors and started melting. Put your broken bits in the tin can and let it sit in the simmering water until all the crayons have melted completely. (Make sure not to use a Teflon coated pot because the can will scratch the bottom.) This was pretty quick and simple. After all was melted I carefully filled my molds and let them set. If you will be doing a whole bunch of crayons I suggest buying a few molds.


After they were set I put them in the freezer to make sure mine were nice and hard. I left them there for an hour. Make sure after pulling out of the freezer to wipe any condensation (if there is any) off from the thawing process. Then make any little boy or girls day. K loves these!


You can also bake your bits in silicone molds. This works better if you want a multi colored crayon. Here is a tutorial on baked crayon molds from Martha Stewart... http://www.marthastewart.com/267304/crazy-crayons
We are going to try this soon. I hope you all make some fun crayons for your little ones to enjoy!

~Scrap fabric storage solution~

Like many of you who sew I find it hard to part with my scrap pieces of fabric. As long as the a large enough to be used in the future I keep them. Up until now I kept them in a mesh laundry bag. It has been overflowing for quite some time. I was shopping one day and found this nifty mesh shoe organizer. I knew instantly what to use it for. Fabric storage of course. Because it is mesh I can see my scraps and it had more room than I need. I use some of the pockets to keep jellyrolls, charm packs, and just random remnants that are too small to put on a mini bolt. For now, it is hanging on that exercise bar in the door way until I find a permanent home for it. I am in the middle of updating my sewing room so everything is kind of everywhere. ;) Hopefully I will have a bright, beautiful, functional sewing room to share with you soon. Until then if you have any neat storage ideas I am all ears. Feel free to share!


Sorry for the not so great photos .... it was late at night. ;)

Tuesday, September 6, 2011

Great recipe finds!!!

Ok so I have been a little lax about blogging....you know things to do and people to see. To make up for it I come bearing some great recipe finds. The other night I wanted something light and out of the norm so I set out for a nice salad. I found this... Southwestern Summer Salad... http://www.skiptomylou.org/2011/08/05/southwestern-summer-salad/
from Skiptomylou's blog. It was wonderful. Super easy and so very refreshing. Oh and did I mention no cooking!!! I took a few pics and made a few changes because I am a picky eater. ;) I am sure it is yummy just as it is...I just changed it to suit my finicky taste buds. I used roasted red bell peppers instead of raw (I don't like them raw), I used an extra can of black beans (we LOVE black beans) , I would have used sundried tomatoes instead of raw but I forgot them (I don't like raw tomatoes either...see I told you I was picky), oh and I added black olives. Olives are a staple around here. hehe. Here are some pics of this must have salad. Oh and the dressing she makes is YUM, YUM!


Almost forgot, I used blue corn chips with flax seed. If you haven't tried these yet you should. They are awesome! Plus you can sometimes find them on sale at Target for 2.99 a bag. Oh and they are organic. I could eat these all day long...even plain. Hhmmm....I think I need a snack.


The second awesome find is from The PioneerWoman....Need I saw more. She is awesome. I love her blog and she has endless, to-die-for recipes. She makes me feel as if I am right there on the ranch with her. I would love to bump into her one day. So for Mr. Wonderful's birthday breakfast treat I searched her lovely blog. I took one look at these and was drooling all over my laptop. Ha! MONKEY MUFFINS! Shut the front door! This is a melt in your mouth goodness that makes you weak in the knees. Oh and it is super simple. I made these with K and E rummaging through the kitchen and still managed to keep it a surprise from Mr. Wonderful who was still in dreamland. Quiet kids and awesome baking...that is a rarity in this house. Trust me. Here is the link .... http://thepioneerwoman.com/cooking/2009/12/monkey-muffins/
You must try these and if you haven't checked out her blog you should. She also just landed a spot on the food network. Kudos to her! Here is a link for her show info... http://www.foodnetwork.com/the-pioneer-woman/index.html


I hope you will try and enjoys these recipes. Feel free to share some of your own or check out my Yum board on pinterest. I have gotten a few more pics loaded today so hopefully tonight I will squeeze in a few more post. I hope everyone enjoyed their holiday weekend!

Thursday, September 1, 2011

Pinterest! and some questions.....

I finally jumped into the pinterest pool! Yay!  I love it! I will have to really make sure to manage my time wisely on there. I am sure I could get lost for hours on there. I think i might set a timer for 30 minutes and only allow one visit a day to see if I can control myself. Ha! I am a very visual person. Having all my bookmarked items in one place will do wonders for my craft productivity. I would love to see any of my readers pins if you would like to share. Feel free to follow mine as well. Do you think I should make my profile name my blog name or leave it as my real name? I was thinking for blog readers it might be easier if I used my blog name. Anywho, I am very new to the whole pinning thing and all tips are welcome. Hope to hear from some of you!

P.S. I have a few post lined up I just need to get my pics on here. I promise there are crafts and recipes soon to come!
Related Posts Plugin for WordPress, Blogger...